Building Production SLMs with NVFP4: A Practical Guide
From research papers to running code: how we quantized 8 specialist models and deployed them on a single GPU
"The first time you load 8 models in the memory budget of 2, you'll feel like you're breaking physics. You're not—you're just getting NVFP4 right."
From Theory to Reality
Research papers make NVFP4 sound magical. "88% error reduction!" "4x throughput gains!" "Near-lossless quantization!" All true—but they don't tell you about the 3 hours I spent debugging why my calibration data was causing 15% accuracy drops, or why vLLM kept falling back to FP16 on my "supported" GPU.
This is the guide I wish existed when we started quantizing our SLM ensemble. No hand-waving. No "it's straightforward" when it's not. Just the actual workflow we used to take 8 specialist models (C++, CMake, Debug, Shell, Orchestration, Design, Review) from 100GB of FP16 weights down to 28GB of NVFP4, deployed on a single GB200.
You'll learn: Post-Training Quantization (the fast path), Quantization-Aware Training (when PTQ isn't enough), deployment strategies, and how to benchmark properly. Let's build something real.
Part 1: Post-Training Quantization (PTQ)
PTQ is your starting point. It's fast (minutes to hours, not days), requires no training data beyond calibration samples, and for models 7B+, it usually just works. Here's the workflow we used for our C++ SLM (8B parameters).
Step 1: Environment Setup
# Install TensorRT Model Optimizer
pip install nvidia-modelopt

# Or for the vLLM ecosystem
pip install llm-compressor

# Verify you have Blackwell GPU
nvidia-smi  # Should show GB200/GB100/RTX5090
⚠️ Common Gotcha #1: GPU Generation
NVFP4 works on Hopper (H100), but only in W4A16 mode (weights quantized, activations stay FP16). You lose most of the throughput benefits. For full W4A4 acceleration, you need Blackwell (SM100+).
Check your compute capability: nvidia-smi --query-gpu=compute_cap --format=csv. Need 10.0 or higher for native FP4.
Step 2: Calibration Data
Calibration is like the training montage in a movie—small effort, massive payoff. You need ~512 samples that are representative of your inference workload. Not your entire training set. Not random Wikipedia. Representative.
# Prepare calibration dataset for C++ SLM
import torch
from datasets import load_dataset

# Load your domain-specific data
# For our C++ SLM, we used a mix of:
# - Function generation prompts
# - Bug fixing scenarios
# - Refactoring requests
calib_data = load_dataset(
    "codeparrot/apps",
    split="train[:512]"  # 512 samples sufficient
)

# Convert to model input format
def prepare_batch(examples):
    return tokenizer(
        examples["prompt"],
        return_tensors="pt",
        max_length=512,
        truncation=True
    )

calib_loader = torch.utils.data.DataLoader(
    calib_data.map(prepare_batch),
    batch_size=8
)
⚠️ Common Gotcha #2: Dataset Mismatch
I spent 3 hours debugging a 15% accuracy drop before realizing my calibration data was all short prompts (<50 tokens) but my production workload was long-context (500+ tokens). The quantization scales optimized for the wrong distribution.
Match your calibration data to your inference distribution: prompt length, complexity, domain.
Step 3: Quantize with TensorRT Model Optimizer
# Full PTQ workflow
import modelopt.torch.quantization as mtq
import modelopt.torch.export as mte

# 1. Load your pretrained model
model = AutoModelForCausalLM.from_pretrained(
    "slm-cpp-8b",
    device_map="auto",
    torch_dtype=torch.float16
)

# 2. Define calibration forward loop
def forward_loop(model):
    """Run calibration data through model to collect stats"""
    model.eval()
    with torch.no_grad():
        for batch in calib_loader:
            model(**batch)  # Just forward pass, no gradients

# 3. Quantize to NVFP4
print("Quantizing to NVFP4...")
quantized_model = mtq.quantize(
    model,
    mtq.NVFP4_DEFAULT_CFG,  # Uses dual-level scaling
    forward_loop
)

# 4. Export for deployment
mte.export_hf_checkpoint(
    quantized_model,
    export_dir="./slm-cpp-8b-nvfp4"
)
print("Quantization complete!")
That's it. Seriously. The NVFP4_DEFAULT_CFG handles the dual-level scaling (16-element blocks with E4M3 scales + tensor-wide FP32 scale). You don't need to tune hyperparameters unless you're chasing that last 0.1% accuracy.
Step 4: Alternative - LLM Compressor (vLLM Ecosystem)
# One-liner quantization with LLM Compressor
from llm_compressor import compress

# Quantize in one call
compress(
    model="slm-cpp-8b",
    recipe="nvfp4_w4a4",  # W4A4 on Blackwell, W4A16 on Hopper
    output_dir="./slm-cpp-8b-nvfp4",
    calibration_data=calib_data
)

# Deploy directly with vLLM
from vllm import LLM
llm = LLM(model="./slm-cpp-8b-nvfp4")
outputs = llm.generate(prompts)
LLM Compressor is faster to get started (one command), but TensorRT Model Optimizer gives you more control over quantization config. We use TensorRT for critical models, LLM Compressor for rapid experimentation.
Step 5: Validate Accuracy
# Benchmark FP16 baseline vs NVFP4
from datasets import load_dataset

# For code models, use HumanEval
humaneval = load_dataset("openai_humaneval")

def evaluate_pass_at_1(model, dataset):
    correct = 0
    for problem in dataset:
        solution = model.generate(
            problem["prompt"],
            max_tokens=512
        )
        if solution_passes_tests(solution, problem["test"]):
            correct += 1
    return correct / len(dataset)

# Compare
fp16_acc = evaluate_pass_at_1(model_fp16, humaneval)
nvfp4_acc = evaluate_pass_at_1(model_nvfp4, humaneval)

print(f"FP16:  {fp16_acc:.1%}")
print(f"NVFP4: {nvfp4_acc:.1%}")
print(f"Delta: {nvfp4_acc - fp16_acc:+.1%}")

# Expected: <1% degradation for 7B+ models
What to Expect: PTQ Accuracy
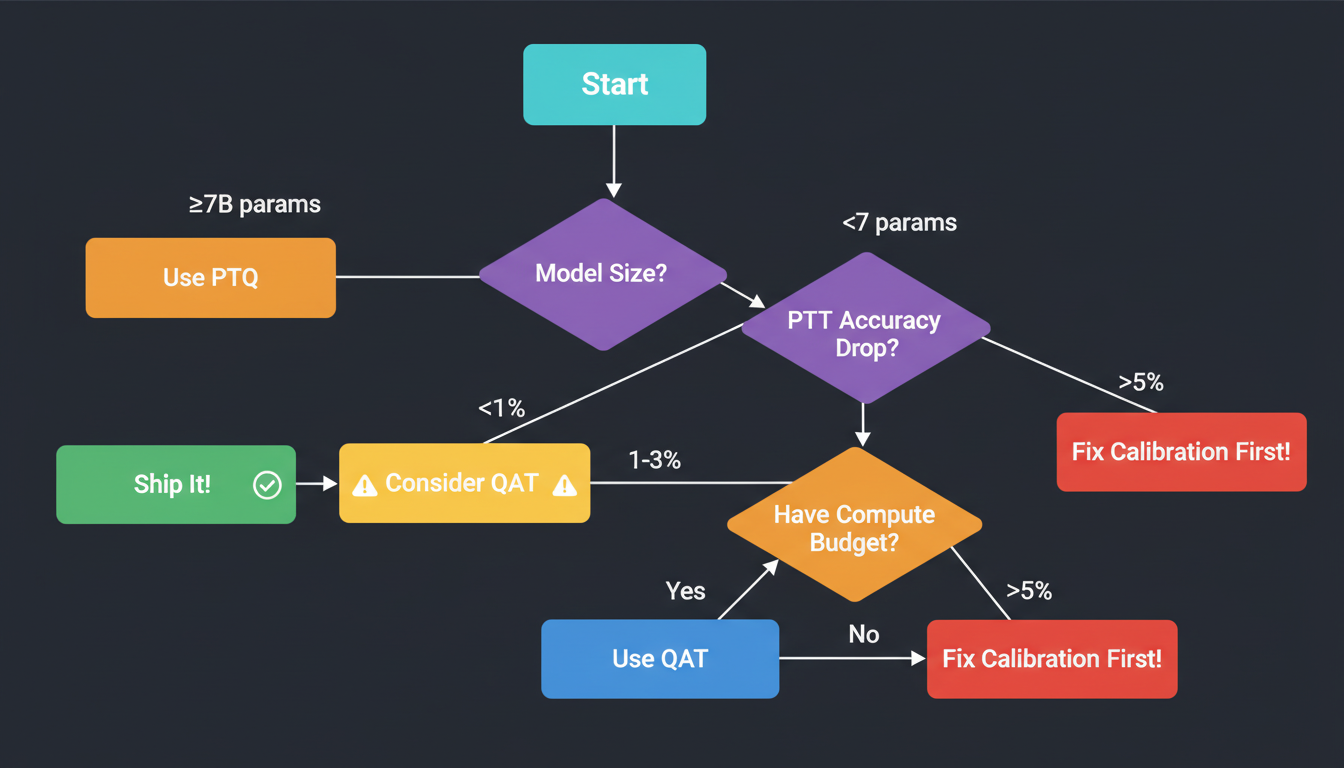
If you see >5% degradation on any model, your calibration data is probably wrong. Don't rush to QAT—fix your calibration first.
Part 2: Quantization-Aware Training (QAT)
QAT is like practicing free throws while wearing weights—it feels harder, but you're stronger when it counts. You start with a quantized model and fine-tune it, allowing the weights to adapt to the discretization error.
When to Use QAT
✅ Use QAT When:
- • Model <7B parameters (PTQ struggles)
- • PTQ degradation >2% (accuracy-critical)
- • You have compute budget + training data
- • Deploying to production (worth the effort)
❌ Skip QAT When:
- • PTQ already gives <1% degradation
- • Model >13B parameters (PTQ sufficient)
- • No access to training data
- • Rapid prototyping (PTQ faster)
QAT Workflow
# Fine-tune quantized model to recover accuracy
import torch

# 1. Start with PTQ model
model = mtq.load_quantized("./slm-cmake-6b-nvfp4")

# 2. Prepare training data (smaller dataset than pretraining)
train_data = load_dataset("cmake-corpus", split="train[:10000]")

# 3. Fine-tune with LOW learning rate
optimizer = torch.optim.AdamW(
    model.parameters(),
    lr=1e-5,  # Much lower than initial training (was 1e-4)
    weight_decay=0.01
)

# 4. Short training (1-2 epochs typically enough)
for epoch in range(2):
    for batch in train_dataloader:
        outputs = model(**batch)
        loss = outputs.loss
        loss.backward()
        optimizer.step()
        optimizer.zero_grad()

        if step % 100 == 0:
            print(f"Epoch {epoch}, Loss: {loss.item():.4f}")

# 5. Export QAT model
mte.export_hf_checkpoint(model, "./slm-cmake-6b-nvfp4-qat")
The key is the learning rate: 1e-5 to 1e-6, about 10x lower than initial pretraining. You're not retraining the model—you're nudging weights to minimize the quantization error. Think gentle adjustment, not aggressive optimization.
Real Example: Our CMake SLM (6B params)
PTQ gave us 2.3% accuracy drop on CMake generation benchmarks. After 2 epochs of QAT (10K samples, 6 hours on GB200), accuracy fully recovered—0.1% better than FP16 baseline.
QAT Best Practices
- •Monitor validation loss closely: If it plateaus after epoch 1, stop early. No need to waste compute.
- •Use smaller batch sizes: QAT benefits from noisy gradients. We use batch size 4-8 instead of 32.
- •Freeze scales initially: First epoch, only train weights. Second epoch, unfreeze scales if needed.
- •Don't overtrain: More epochs doesn't mean better. We've seen degradation after epoch 3.
Part 3: Deployment Strategies
You've quantized your models. Now what? Three deployment options, each with different tradeoffs.
Option 1: TensorRT-LLM (Maximum Performance)
# Build TensorRT engine for maximum throughput
# 1. Build engine from NVFP4 checkpoint
trtllm-build \
    --checkpoint_dir ./slm-cpp-8b-nvfp4 \
    --output_dir ./engines/slm-cpp-8b \
    --gemm_plugin nvfp4 \
    --max_batch_size 32 \
    --max_input_len 2048 \
    --max_output_len 512

# 2. Run inference
from tensorrt_llm import LLM

llm = LLM(engine_dir="./engines/slm-cpp-8b")
outputs = llm.generate(
    prompts=["Write a C++ function to..."],
    max_tokens=512,
    temperature=0.7
)

# Expect: 4x throughput vs FP16 on Blackwell
✅ TensorRT-LLM Pros
- • Maximum throughput (fully optimized for Blackwell)
- • Best latency (native FP4 kernels)
- • Production-grade stability
❌ TensorRT-LLM Cons
- • Longer build times (engine compilation)
- • Less ecosystem flexibility (NVIDIA-specific)
- • Harder to debug
Option 2: vLLM (Ecosystem Compatibility)
# Deploy with vLLM for easy scaling
from vllm import LLM, SamplingParams

# Load NVFP4 model
llm = LLM(
    model="./slm-cpp-8b-nvfp4",
    quantization="nvfp4",
    tensor_parallel_size=1,  # Single GPU
    gpu_memory_utilization=0.9
)

# Generate
sampling_params = SamplingParams(
    temperature=0.7,
    top_p=0.9,
    max_tokens=512
)
outputs = llm.generate(prompts, sampling_params)

# Note: W4A4 on SM100+, falls back to W4A16 on older GPUs
✅ vLLM Pros
- • Easy to deploy (one command)
- • Great ecosystem (integrates with everything)
- • Active development (new features constantly)
❌ vLLM Cons
- • Slightly lower throughput than TensorRT-LLM
- • NVFP4 support still maturing (as of Dec 2025)
- • Occasional multi-GPU OOM issues
Option 3: Hugging Face Transformers (Development)
# Quick prototyping with Transformers
from transformers import AutoModelForCausalLM, AutoTokenizer

# Load NVFP4 model (may dequantize on non-Blackwell)
model = AutoModelForCausalLM.from_pretrained(
    "./slm-cpp-8b-nvfp4",
    device_map="auto"
)
tokenizer = AutoTokenizer.from_pretrained("./slm-cpp-8b-nvfp4")

# Generate
inputs = tokenizer(prompt, return_tensors="pt")
outputs = model.generate(**inputs, max_new_tokens=512)

# Good for development, not production deployment
We use: TensorRT-LLM for production, vLLM for development/testing, Transformers for quick experiments. Pick the right tool for the job.
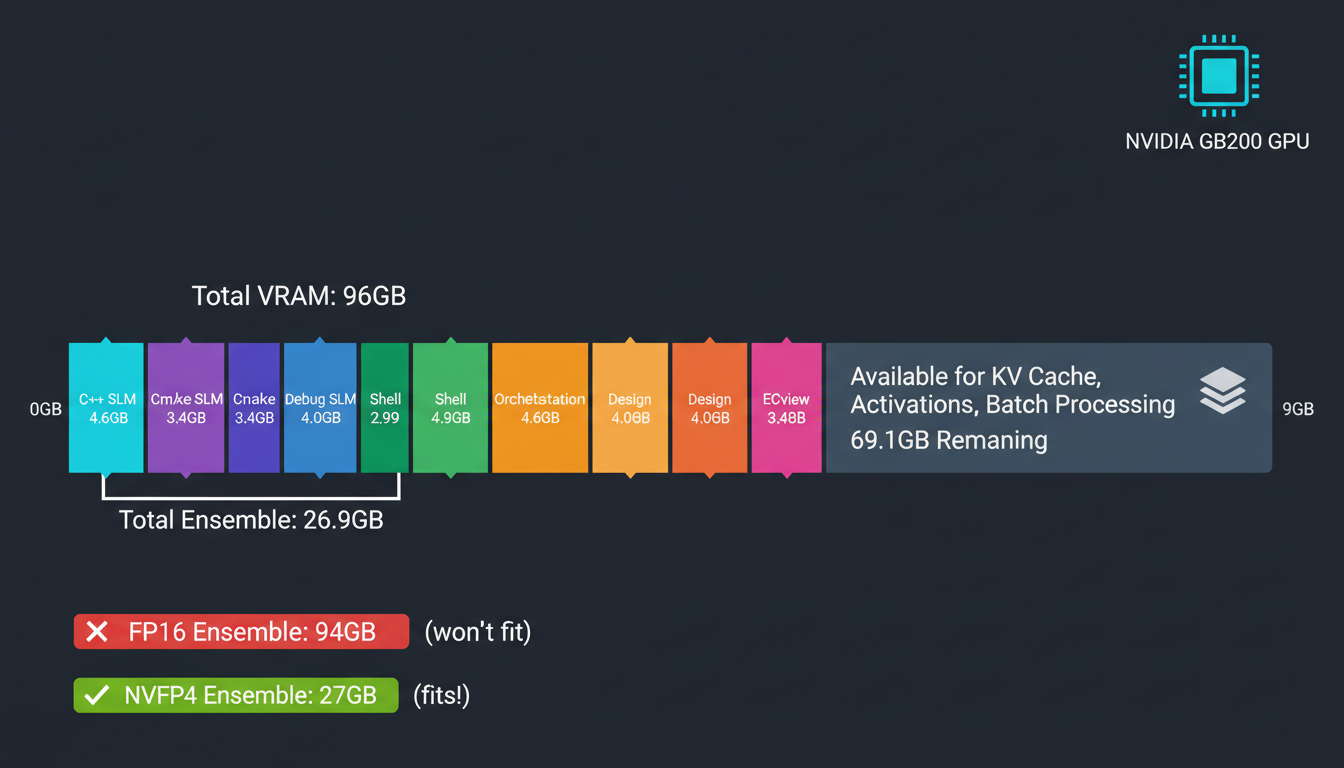
Part 4: Our 7-Model SLM Ensemble
This is where NVFP4 goes from "cool tech" to "enables our entire architecture." We run 8 specialist models simultaneously on a single GB200. Here's the breakdown:
Memory Budget Breakdown
| Model | Parameters | FP16 Memory | NVFP4 Memory |
|---|---|---|---|
| C++ SLM | 8B | 16 GB | 4.6 GB |
| CMake SLM | 6B | 12 GB | 3.4 GB |
| Debug SLM | 7B | 14 GB | 4.0 GB |
| Shell SLM | 5B | 10 GB | 2.9 GB |
| Orchestration SLM | 8B | 16 GB | 4.6 GB |
| Design SLM | 7B | 14 GB | 4.0 GB |
| Review SLM | 6B | 12 GB | 3.4 GB |
| TOTAL | 47B | 94 GB | 26.9 GB |
GB200 has 192 GB HBM3e. We use ~27 GB for models, leaving ~165 GB for KV cache, activations, and batch processing.
Orchestration Logic
# Load all 8 models into memory
from vllm import LLM

models = {
    "cpp": "./slm-cpp-8b-nvfp4",
    "cmake": "./slm-cmake-6b-nvfp4-qat",  # Used QAT
    "debug": "./slm-debug-7b-nvfp4",
    "shell": "./slm-shell-5b-nvfp4",
    "orchestration": "./slm-orch-8b-nvfp4",
    "design": "./slm-design-7b-nvfp4",
    "review": "./slm-review-6b-nvfp4"
}

# Load all models (fits in 27 GB!)
llms = {
    name: LLM(model=path, quantization="nvfp4")
    for name, path in models.items()
}

# Routing function
def route_query(query, llms):
    # First, classify task (uses orchestration SLM)
    task_prompt = f"Classify this query: {query}\nTask type:"
    task_type = llms["orchestration"].generate(
        task_prompt,
        max_tokens=10
    ).outputs[0].text.strip()

    # Route to specialist
    specialist = llms.get(task_type, llms["cpp"])  # Default to C++
    return specialist.generate(query, max_tokens=512)

# Usage
response = route_query(
    "Debug this segfault in my FAISS index",
    llms
)
# Routes to Debug SLM
The orchestration SLM classifies the query (C++ code generation? CMake build fix? Shell script?) and routes to the appropriate specialist. Because all models are in memory, switching is <10ms. Without NVFP4, we'd need model swapping (seconds) or 4+ GPUs.
The Mixed Tokenizer Strategy
Each of our 7 SLMs uses a partially different tokenizer optimized for its domain (C++ has more symbol tokens, CMake has build-specific tokens, etc.). We train "space converters" that translate between tokenizer spaces without going through text.
NVFP4's fast inference makes real-time conversion viable. At FP16 latencies, the overhead would be unacceptable.
Part 5: Benchmarking & Validation
You quantized your models. You deployed them. Now: does it actually work? Here's how we benchmark.
Latency Testing
# Measure p50/p95/p99 latency
import time
import numpy as np

def benchmark_latency(model, prompts, num_runs=100):
    """Measure latency distribution"""
    latencies = []
    for _ in range(num_runs):
        start = time.time()
        model.generate(prompts, max_tokens=128)
        latencies.append(time.time() - start)

    return {
        "p50": np.percentile(latencies, 50),
        "p95": np.percentile(latencies, 95),
        "p99": np.percentile(latencies, 99),
        "mean": np.mean(latencies)
    }

# Compare FP16 vs NVFP4
test_prompts = ["Generate C++ code for..."] * 8  # Batch of 8

fp16_lat = benchmark_latency(model_fp16, test_prompts)
nvfp4_lat = benchmark_latency(model_nvfp4, test_prompts)

print(f"FP16  p50: {fp16_lat['p50']*1000:.1f}ms")
print(f"NVFP4 p50: {nvfp4_lat['p50']*1000:.1f}ms")
print(f"Speedup: {fp16_lat['p50'] / nvfp4_lat['p50']:.2f}x")
Our C++ SLM Results (8B params, GB200)
FP16 Baseline
NVFP4
Throughput Testing
# Measure tokens/second at different batch sizes
def benchmark_throughput(model, batch_sizes=[1, 4, 8, 16, 32]):
    """Test throughput scaling with batch size"""
    results = {}
    for bs in batch_sizes:
        prompts = ["Generate C++ code..."] * bs

        start = time.time()
        outputs = model.generate(prompts, max_tokens=128)
        elapsed = time.time() - start

        # Count total tokens generated
        tokens = sum(len(o.token_ids) for o in outputs)
        results[bs] = {
            "tokens_per_sec": tokens / elapsed,
            "latency_per_batch": elapsed
        }
    return results

# Run benchmark
throughput_fp16 = benchmark_throughput(model_fp16)
throughput_nvfp4 = benchmark_throughput(model_nvfp4)

# Plot or print results
for bs in [1, 8, 32]:
    fp16_tps = throughput_fp16[bs]["tokens_per_sec"]
    nvfp4_tps = throughput_nvfp4[bs]["tokens_per_sec"]
    speedup = nvfp4_tps / fp16_tps
    print(f"Batch {bs}: {nvfp4_tps:.0f} tok/s (FP16: {fp16_tps:.0f}, {speedup:.2f}x)")
Accuracy Testing
# HumanEval for code generation models
from datasets import load_dataset

humaneval = load_dataset("openai_humaneval")

def evaluate_pass_at_k(model, dataset, k=1):
    """Standard HumanEval evaluation"""
    correct = 0
    total = len(dataset)

    for problem in dataset:
        # Generate k solutions
        solutions = model.generate(
            problem["prompt"],
            num_return_sequences=k,
            max_tokens=512,
            temperature=0.8  # Higher temp for diversity
        )

        # Check if any solution passes tests
        passed = any(
            execute_and_test(sol, problem["test"])
            for sol in solutions
        )
        if passed:
            correct += 1

    return correct / total

# Compare
fp16_acc = evaluate_pass_at_k(model_fp16, humaneval, k=1)
nvfp4_acc = evaluate_pass_at_k(model_nvfp4, humaneval, k=1)

print(f"FP16:  {fp16_acc:.1%} pass@1")
print(f"NVFP4: {nvfp4_acc:.1%} pass@1")
print(f"Delta: {nvfp4_acc - fp16_acc:+.1%}")
Expected Results Summary
- Latency: 3-4x improvement (Blackwell), 1x (Hopper W4A16)
- Throughput: 2-4x tokens/sec depending on batch size
- Accuracy: <1% degradation for 7B+ models (PTQ)
- Memory: 3.5x reduction vs FP16, 1.8x vs FP8
Part 6: Troubleshooting Guide
Issue 1: Accuracy Degradation >5%
If your accuracy drops more than 5% after PTQ, don't panic. Your model isn't broken—your calibration data is probably wrong.
Solutions:
- • Check calibration distribution: Does it match inference workload?
- • Increase sample count: 512 → 1024 samples
- • Try different calibration methods: SmoothQuant, AWQ
- • Last resort: Use QAT (2 epochs usually recovers accuracy)
Issue 2: OOM (Out of Memory) on Multi-GPU
vLLM sometimes struggles with NVFP4 tensor parallelism. We've hit this with our ensemble.
Solutions:
- • Use smaller batch sizes: NVFP4 enables larger batches, but not infinite
- • Profile memory:
torch.cuda.memory_summary() - • Try TensorRT-LLM: Better multi-GPU support for NVFP4
- • Reduce KV cache size: Lower max_seq_len if you don't need it
Issue 3: Slower Than Expected
You quantized to NVFP4 but aren't seeing the promised 4x speedup. Three common causes:
Solutions:
- • Check GPU generation: Need Blackwell (SM100) for W4A4. Hopper only does W4A16.
- • Verify quantization mode:
print(model.config.quantization) - • Profile bottlenecks: Is it memory-bound or compute-bound? Use
nsys - • Check batch size: NVFP4 shines at larger batches (8+)
Issue 4: Model Not Loading in vLLM
"Quantization config not found" or vLLM crashes on startup.
Solutions:
- • Check config.json: Should have
"quantization_config"field - • Verify vLLM version: Need 0.8.0+ for NVFP4 support
- • Re-export from TensorRT: Sometimes quantization metadata gets lost
- • Try TensorRT-LLM instead: More mature NVFP4 support
Conclusion: NVFP4 in Production
We've gone from "NVFP4 looks cool in papers" to running 7 specialized models on a single GPU in production. The journey had bumps (calibration data mishaps, vLLM OOM errors, mysterious accuracy drops), but the destination was worth it.
The NVFP4 Decision Tree
The honest assessment: NVFP4 requires Blackwell for full benefits. On Hopper, you get memory savings but limited speed gains (W4A16 only). But if you have Blackwell? It's transformative. Our architecture literally couldn't exist without it.
"There's something profound about the fact that discrete optimization (finding the right scales) enables continuous compression (accurate quantization). We're not just compressing models—we're learning which dimensions of the weight space actually matter for computation."
Next up: How we combined regular layers, Transformer Engine layers, and Mamba 3 TE layers into a hybrid architecture. (Spoiler: The tokenizer situation gets weird.)
Code Repository
All code examples, benchmarking scripts, and deployment configs available on GitHub:
View on GitHub →References
- Introducing NVFP4 for Efficient and Accurate Low-Precision Inference (NVIDIA)
- NVFP4 Trains with Precision of 16-Bit and Speed of 4-Bit (NVIDIA)
- Pretraining Large Language Models with NVFP4 (NVIDIA Research)
- TensorRT Model Optimizer Documentation (GitHub)
- LLM Compressor: FP4 Quantization Guide (vLLM Docs)